
How to Make Brown Paper Flowers
I’m so excited to share this tutorial with you guys today! Below you will find the step by step instructions on how to make these super famous brown paper flowers!

What you will need to make Brown Paper Flowers
- 1 pair of scissor
- 6-8 brown paper bags
- 1 glue stick
- leaf template if needed…….

1. With bottom flap towards you cut off the bottom of the bag right above the fold. Save the bottom parts! I might be using them in another craft and well,so might you!
2. Free hand a leaf shape or use a template leaf shape on the brown bag and cut. Make the leaf shape as wide as you can.
3. Leave one end flat and the other pointed.
*As you cut the leaves, smaller parts will start to fall out. Save these and collect them for the second part of the flower.


4. Slightly fold the larger leave in half and glue flat end leafs together in a flower shape. Repeat until you have a full flower. I stop at about 8 leaves for the large flower.
5. Now get those smaller leaf parts and do the same thing you did in step four.
*TIP as your gluing the leaves down don’t flatten them. Keep them slightly elevated and keep overlapping them. Also make sure you are bending them in half to get a 3D affect.

Now you should have two flowers one small and one large. Glue the smaller one on top of the bigger one.
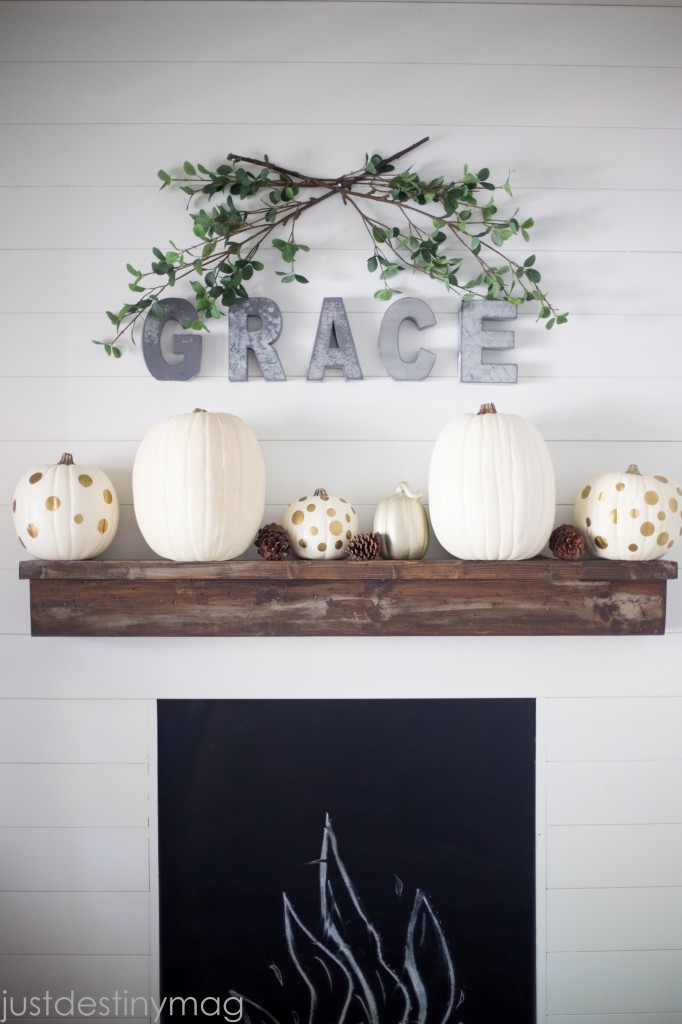
Put it all together and what do you get?


Simple details can make the biggest difference! Wasn’t that so easy! Now go make hundreds of them!!
Check out more of my fall mantels…

I love them! You, my dear, have convinced me to make a few…. As if convincing me to add to my ever growing list of things to do is difficult! HA!
Awesome idea.
These are so great! And, look so easy to make.
PS- your mantle looks straight from a Pottery Barn Magazine! Great job girly!
Love this idea! Thanks for sharing.
Love these :)! Featured your “x wall” over at A2Z today!
Oh I like these…and your mantle decor too!
xo, Shannon
Love how simple but lovely they are! Gorgeous!
Oh my gosh, I seriously AM going to go make hundreds of those! LOVE how you have them climbing up the wall – so pretty and natural looking!!
Love these!!! Thanks for sharing!
Oh my! These are fabulous! I just love how easy they are! Thanks for sharing them! 🙂
P.S. I loved that you stopped by my blog! Please come again soon!
So many crafts are just too cutesy for me, but this is just gorgeous. I love the artistic, yet rustic look of these. Beautifully done! I think I see some of these in my future. Thanks for sharing!
The simplicity of the flowers is what makes them so beautiful. Great job, they are stunning for fall. And thanks for showing us how you made them!
HOW GORG. does that look. So PB and Decorative looking. Well done. winks-jen
Oooh those are awesome! Thanx for sharing! I love them!
Natalie
http://www.projectdowhatyoulove.wordpress.com
Hi Destiny! These are wonderful! I love them. I really want to make some for myself. I love your blog too, super cute:) I stopped by from Centsational Girl’s Fall Craft link party. So glad I did:) I’m your newest follower. I hope you’ll stop by The Corson Cottage sometime and consider following:) Carrie
Alright woman. These are cute! But you already know that. Ahem. I’d like to see your next blog post be about how you do ALL that you do with 3 young children! ‘Cause I don’t do 1/2 what you do & I can’t get it all done! I need some help! 🙂
OH MY! This are fabulous! and I LOVE the mantel you put together with these beautiful blossoms.
I would love for you to link up your creation at http://www.jaqsstudio.com/2011/10/jaqs-studio-first-ever-linky-party.html
Saw this on Pinterest. LOVE!!!
great diy! and the mantle display is gorgeous
Um, wow…I just found this tutorial via Pinterest and I LOVE it!!! I am seeing these on my Christmas tree this year!! LOVE your home, too!! Can’t wait to see more of your mantle{my preferred spelling ;)…}
Elise
What is the small center in some of yours? So cute.
GOOOOOD Morning this Saturday- I wanted to let you know that your “Talent” was featured over on COM today. xo-winks-jen
Those look amazing…and so easy!
I thought I was looking at Pottery Barn! YOU created an amazing mantel!! Thank you for sharing your beautiful idea!!
Share more pics!! I would LOVE to SEE MORE please.
I LOVE these! So so cute!!
LOVE LOVE THESE!! Thank you for sharing!! 🙂
These are so stinkin’ cool!! Love them! Pinning for future reference. 🙂
Ou! I need to make some of these. They are SO gorgeous. Talk about upcycling!
I love thses and the color is perfect for fall, now I need some brown paper bags!
Debbie
Absolutely beautiful Destiny!!
Thank you so much for sharing this! I paid a dollar for a bag of brown lunch sacks and now I have beautiful flowers on my wall. This was very easy, fast and very cute outcome! Thanks again 🙂
I love these!! I posted them on my pinterest and there’s a good chance I’ll be making some in the near future :). Thanks for the inspiration!
brilliant! easy, cheap and fun!!! thank you so much! my kids and i are going to love doing this! 😉
Thank you, thank you, thank you, I teach a class of handicapped adults and this was a favorite! The bags were just thick enough for them to cut easily and since this week we are having an art gala these were perfect fill ins for the decorations! And I enjoyed your playlist also! I left feeling blessed. Thank you again!
I made one! Yours looks way better 🙂 I need to work on it a little I guess–then I’ll post and let you see. Thanks for the instructions!!
The effect that adds to that wall there is HUGE!! These look amazing:) I definitely think I’m going to make some!
Great share I will enjoy these I think making them out of White paper bags for Christmas will look wonderful too <|;-)
brown paper bags now on my shopping list…
cannot wait to make these!
Blessings
http://bit.ly/ouXgr8
very nice !
I saw these pictures on Pinterest and made them. They look AMAZING! Thank you!
We have manna night at church…It is a out reach program right in our small town. This would be wonderful for those underadvantage kids….Also my grandsons would love to help! Get them started young!
I am a newbie to your blog asnd must say you are very talented I just love the paper bag flowers makes me want to run to the store and get some!
I was just thinking about ideas for decorating my boutique flower for the holidays. I’m using red, white, black and gold. these flowers will be a dramatic addition to a hutch that needs something over the top. Thanks so much for the inspiration!
I love these! I am actually going to go on the hunt for red and white paper bags because I think they would make gorgeous holiday decorations. My tree is filled with red and white pointsettia’s so this flowers would tie my tree in with the rest of the decor!
Instead of colored bags, why not have the children color the leaves?
Thanks for the tutorial. I made these for my daughter’s 1st birthday and used them on her highchair and the wall behind her highchair. If you’d like to see… http://www.stuffbymaja.blogspot.com
I saw these on Pinterest this afternoon… WOW! Thanks so much for sharing these! Now I know why I’ve got brown paper bags hiding in my pantry!!
Just saw these on Pinterest… WOW!! These are great! Now I know why I’ve got a stash of brown paper bags in my pantry… Thanks so much for sharing!!
I love these. I am making them out of red and white bags so they are going to be gorgeous pointsettia decorations!
These flowers r soooo pretty!
I love these! I think I’m going to use your tutorial real soon!
Hope it is ok that I pinned them so I can go back and find them when I am ready to make them if not plz lmk and I will remove I did use the link to them so if anyone wants to make
Can you tell me about your mantle, did you do it yourself, if so what kind of wood did you use? I love this picture I have looked at it everyday for the last week. I think I am going to make some of those flowers out of maps!
I must be the dumbest novice in the world because I simply can’t grasp the whole cutting of
The brown bag thing;-( Where do u cut it and how are there smaller pieces after?? I guess I don’t even grasp how to lay it out in front of me;( HELP!!!!
Saw you on Nate a few minutes ago and have bookmarked your blog. Love it!! Thanks so much for sharing such great ideas. You looked and were amazing today on Nate 🙂
I just saw you on the Nate Burkus Show – Great job – I am going to give these a try – you will have the whole country growing paper bag flowers in there home! Thanks
Scrapnbits
i was thinking about the crafts to use the scraps on, and thought I’d share with you. I made pink paper bag flowers and the bottom would be a beautiful lining to a cellophane bag for gifts or treats. 🙂 I love this idea by the way.
I saw these on the Nate Show and loved them! I had to make some for myself. I’m a musician, so I decided to make mine out of old sheet music. Here is a link to my blog post about them: http://lil-honeybee.blogspot.com/2012/02/rock-n-roll-flowers.html. Thank you for the tutorial! 🙂
You were great on Nate’s show!! How fun was that?!?
I love the idea, but this tutorial is incredibly vague. Could you include details about where to cut on the bag?
I love the idea, but the tutorial is very vague. Could you be a little more specific about where to cut on the bag, and how the petals should turn out?
I love the idea, but this tutorial is incredibly vague. Could you include details about where to cut on the bag?
I completely forgot to tell you I made your flowers, and they look GREAT! I used ivory colored bags, which I bought at Walmart. I also put your link on my blog. Thank you!!!
http://condensedlovehome.blogspot.com/2012_02_01_archive.html
They do look lovely, fabulous flowers! I’ve got this linked to my paper flowers post too today – for inspiration!
I saw you on Nate Berkus and decided to try this craft out myself. I decided they needed a center. I had some squares from scrap booking, but I think large colorful buttons would look amazing too! Thank you for this idea. You will be on my “must read” list from now on for sure!
I saw you on Nate Berkus and decided to try this craft out myself. I decided they needed a center. I had some squares from scrap booking, but I think large colorful buttons would look amazing too! Thank you for this idea. You will be on my “must read” list from now on for sure!
This comment has been removed by the author.
I absolutely love these!!
One question, how did you hang them on the wall??
This comment has been removed by the author.
That was a cool project. I love the way those paper flowers blend with the pumpkin and other stuff there.
digital cameras
Making these right now and LOVE how they’re coming out. Same question though-how are you hanging them to your wall?
Nevermind, I just saw on your FAQ that you use Elmer glue dots. Thanks!
I made these for my daughters room today and posted a picture on my blog: http://bishopsfamilysite.blogspot.com/2012/04/brown-paper-flowers.html
I linked your blog page and the Brown Paper Flower tutorial page.
Thank you for this wonderful project. I just love your blog so much!
Blessings!
Janiene
The design looks very compelling. I admire your creativity in making these stuffs. By the way, you also took great photos of your work of art.
wedding photography
i admire your effort. i like it.
Send Flowers Pakistan
Send Flowers Pakistan
Send Flowers Pakistan
These are cool flowers,have you a video on it.
plastic card holders
plastic business cards
scratch cards printing
I shared this amazing tutorial on my blog! I hope you will visit. YOu are so creative.
http://thesweetestmemoryblog.blogspot.com/2012/05/sweet-inspiration-amazing-and-thrifty.html
Kari
these flowers are so great for party decor or even for a children to make for their mother.
These paper flowers are also unique if you put this on the kraft paper bags. It’s more creative and unique or put on different colors on the flowers before putting in the Kraft bags.
Are these large grocery bags or the small lunch bag size?
Stunning! Love how they go up the wall! Great addition to your mantel! Thanks for linking up to The Talent Scouting Party at WhisperWood Cottage!
A lovely natural addition! Great for recycling paper into decor!
Congratulations on being one of the finalist in Whisperwood Cottage’s autumn decor. Love the simplicity of the brown paper bags.
was just about to shell out serious $$ for a wreath for the front but came across this lovely flower craft and will be making my own wreath!
Thanks and blessings ♥
Super cute! Will try for sure!
Oh I like these…and your mantle decor too!
♥ standing pantry
Thank you for including my flowers!! LOVE all your other picks!
Thank you so much for the tutorial! I have been wanting to make these for so long. I finally had time today and I love them!! Thanks again.
I fell in love with these so much I hunted up my lunch bags and made a bunch! lovely- thanks for this simple yet rustic idea! I am a flower lover! love your ideas-
So happy you liked them!!!
Great post! I will be featuring it on my blog this fall! Thanks! http://creativelycheap.com/
Favolosa questa tua idea, la metterò in pratica al più presto! Grazieeee
Ciaooo
They stand out do nicely when we have gatherings. They look so nice. Thank you for the tips!